Create Azure Blob storage from scratch and adding to Telestream Cloud
If you are an enthusiast and use the software and solutions offered by Microsoft on a daily basis, the best solution is to use Azure Blob storage for Telestream Cloud services.
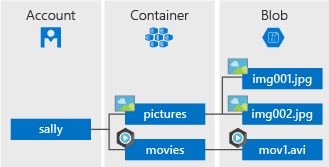
All your data (objects) in Azure Blob is stored as the so-called blobs in the containers. This is the equivalent of buckets that are used in Amazon S3 and Google Cloud Storage.
At the beginning, let's explain the structure of Azure Blob storage. It has three types of resources:
- The storage Account
- A container in the storage account
- A blob
Now you need to create a container for Telestream Cloud. First, you have to create storage account if you don’t have one already.
How to create storage account, step by step:
- If you don't have an Azure subscription, go to https://azure.microsoft.com/free/ to create a free account before you begin.
- In the next step, you need to log in to https://portal.azure.com/
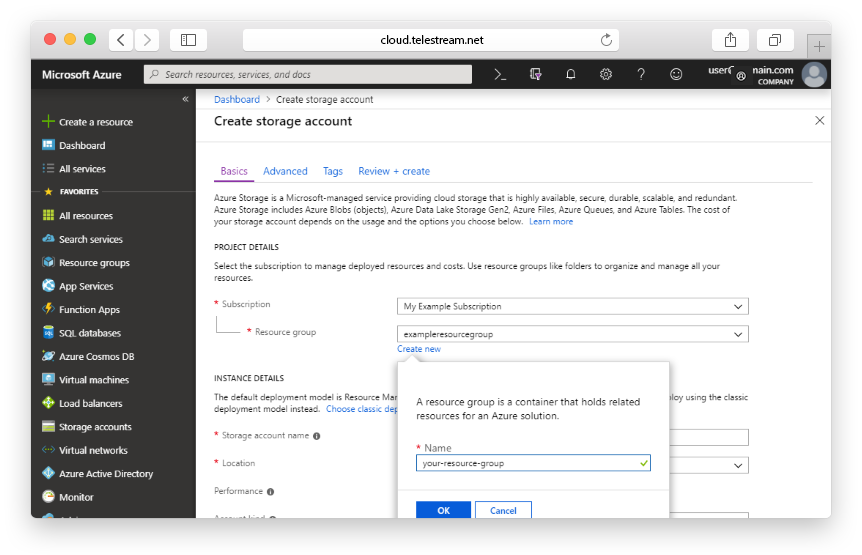
Every storage account must belong to some Azure resource group - a logical container for grouping your Azure services. When you create a storage account, you have the option to either create a new resource group or use an existing one. We’ll show you how to create a new one.
A general-purpose v2 storage account provides access to all of the Azure Storage services: blobs, files, queues, tables, and disks. Go to Azure portal and then:
- Select All services.
- Start typing Storage accounts in the list of resources, and select it.
- The Storage accounts window will appear, choose Add.
- Select the subscription in which to create the storage account.
- Click on Create new under Resource group field.
- Enter a name for your new resources group.
- The next thing is the name for your new storage account. It must be unique across Azure. It can consist of 3 to 24 characters and includes numbers and lowercase letters.
- Select a location for your storage account, or use the default location.
- Leave these fields set to their default values:
| Field | Value |
|---|---|
| Deployment model | Resource Manager |
| Performance | Standard |
| Account kind | StorageV2 (general-purpose v2) |
| Replication | Locally redundant storage (LRS) |
| Access tier | Hot |
- We’re almost done! Select Review + Create.
- If the review was successful, click Create.
Now it’s the time to create a container for Telestream Cloud.
Follow the instruction, step by step:
- In the left menu for the storage account, scroll to the Blob service section, then select Blobs.
- Then click on Container button.
- Enter a name for your new container. You can use numbers, lowercase letters, and dash (-) characters.
- Select the level of public access to the container. The default level is Private (no anonymous access) and we recommend to leave it this way..
- Click OK to create the container.
Your container is ready. Well done!
Enable your Azure Blob storage in Telestream Cloud console
Before you do that you will need to obtain your Storage Access Key.
- Go to Azure portal.
- In the navigation panel, click on All resources.
- Choose the proper storage account.
- Click on the Key icon to view the Access Keys for the storage account. Note that every storage account has two Storage Access Keys.
- Click on the Copy icon next to the first Storage Access Key.
- Open your Telestream Cloud console and paste the copied Storage Access Key.
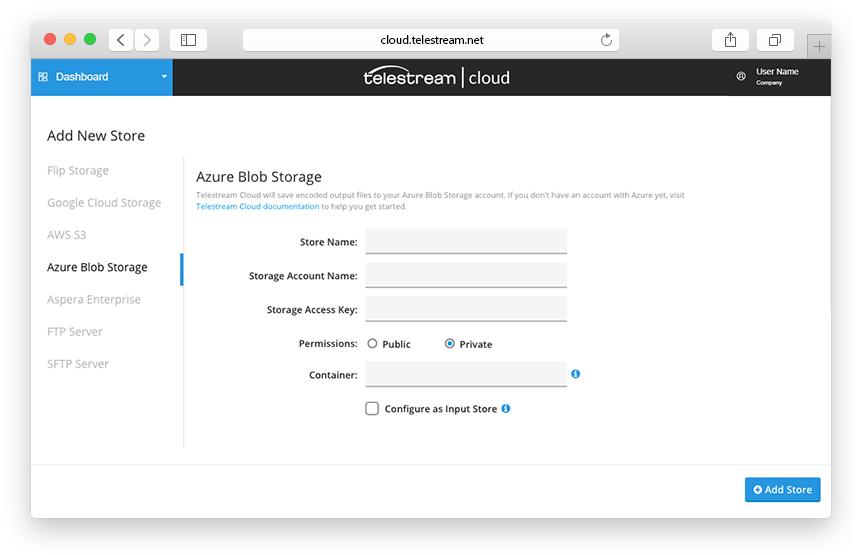
- Fill in the appropriate fields, giving the store name, entering the storage account name and the container name.
- Click Add Store and it’s done.
You’re now ready to use full potential of Telestream Cloud!